
7 DAYS TO DIE — THE REBUILDER CHALLENGE—FOR ADULT
- dreamwriterariaros
- Feb 20
- 23 min read
A FAMILY SITE NOTICE
This is a family site. The content below is written in a family-friendly way.
7 Days to Die is a mature-rated game, and for great reasons. Even if you permanently turned zombie spawning off and did nothing but rebuild, the trader's language is crude, there are remnants of gore left behind in the environment, and the game would still not earn an E for Everyone rating. This is a mature challenge written for adults who play a mature game,
presented in the family-friendly voice that this site maintains for all of its content.

THE REBUILDER
Rebuild Civilization. Coexist With the Residents. Find the Cure.
"I love big beautiful cities and I love healing folks, so this is my version of the world."
THE STORY
The world is broken. Buildings are gutted, bridges have holes, and the residents — well, they're not themselves right now. They're not monsters. They're not enemies. They're people dealing with a condition, and they deserve better than crumbling ruins and empty shelves.
You are a disaster recovery worker. You've been dropped into a devastated zone with one mission: rebuild civilization from the ground up. Every house needs to be a home. Every business needs to function. Every resident deserves clean water, stocked kitchens, medicine, safety equipment, and a roof that doesn't leak.
You're not here to fight. You're here to heal. But sometimes, during blood moon episodes, some residents lose control. They can't help it. Your job is to keep the community safe using non-lethal crisis response — tranquilizer guns, protective armor, and the fortified base you've built. The ones having episodes forget how to use their safety gear, but their housemates don't.
When the work is done and the town is rebuilt, the zombies come home to live in the civilization you've created. And when you've proven it can survive? The cure is found. The residents are healed. You rebuild one last time — and this time, you're stocking dressers with clean clothes for people who are finally themselves again.
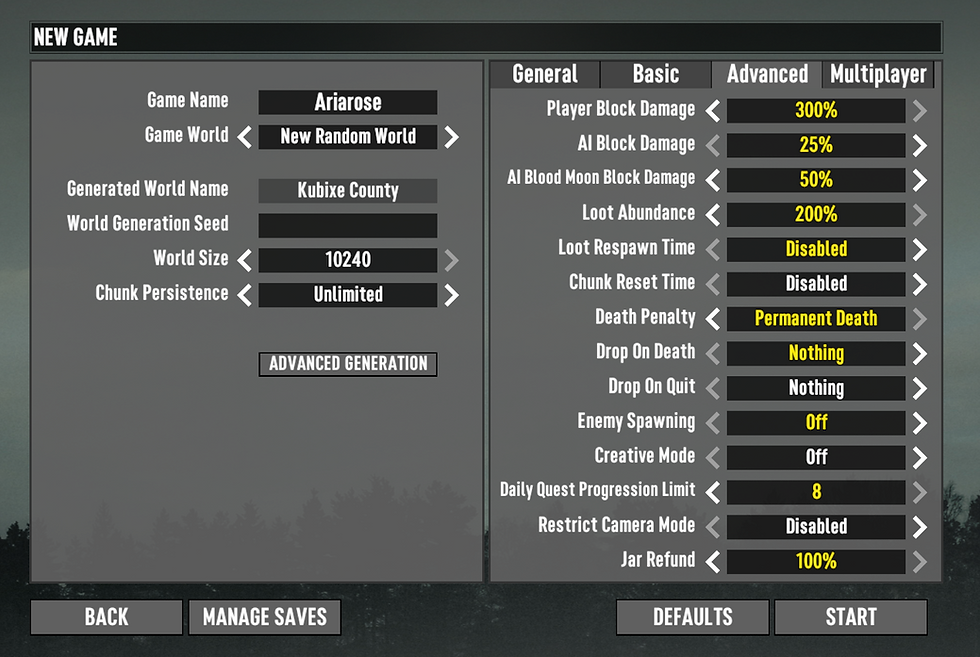
REQUIRED GAME SETTINGS
Difficulty: Survivalist
Blood Moon Frequency: 30 Days
Blood Moon Range: 20 Days
Day Length: Maximum
Zombie Spawning: Off (until and as needed)
Loot Respawn: Off
House/POI Reset: OPTIONAL — Your choice (see below)
Glass Jar Return: 100% — civilized people wash their dishes
Air Drops: Manual via debug/spawn commands


ONE LIFE TO LIVE
This is a permadeath challenge. You die for ANY reason and the challenge is OVER. No respawns, no second chances, no excuses. It does not matter how you die — if you planned your base properly for blood moons and managed your resources carefully, you really shouldn't die. But this game has many ways to kill you that have nothing to do with zombies:
* Cave-ins while mining
* Falling through the earth's crust from digging too deep
* Fall damage from heights while rebuilding or traversing mountains
* LAG DEATHS while flying — you fall out of the sky and it counts
* Infection from zombie encounters if you run out of antibiotics
* Starvation from poor food chain planning
STRONG ADVICE: AVOID FLYING. Lag can kill you instantly with no warning. The challenge creator lost a 350-day, max-level character who had survived with zombies permanently on and never died once — lag dropped them out of the sky. Don't let that be you. Stay on the ground whenever possible.
Your first zombie encounters happen during the opening air drop phase when you're spawning one per crate. You are only fighting at the point YOU say go — when your storage is filled with goods and you have real protection and real defense. After that, blood moons are the only combat until Phase 3. Plan accordingly and you'll live. Get careless and it's over.
House/POI Reset — A Strategic Choice
This setting is up to you and changes the challenge significantly. If POI reset is ON, trader quests will destroy any rebuilt building in that block area when you click it. This wipes out your work. This means you must be extremely careful about which quests you accept — never run quests at locations you've rebuilt. However, it also means NO double-dipping on important resources since buildings won't respawn loot.
Eventually you will run out of locations you CAN quest at, cutting off trader quest income entirely with the exception of buried treasure.
If POI reset is OFF, quests are safe but you lose the resource tension. Either way, burial site quests are generally safe. Choose at the start and commit. Note I have always played with resetting so I am not positive quest lists, research states it would work this way, but either way you eventually run out of viable quests beyond buried treasure and do you even want to destroy the roads you fixed?

HOW TO SPAWN SUPPLY CRATES AND ZOMBIES
This challenge uses manual spawning for air drops and zombies. Here's how to do it.
Spawning Supply Crates:
Press F1 to open the console. Type spawnsupplycrate and hit Enter. The supply crate will drop at your location. This command does NOT require debug mode — just the console. After you drop them move otherwise they land on your head. It doesn't damage but it can occasionally trap you. If you spawn extra crates for the first major drop to save a little time, you might find you can't do anything with the added stuff if you're not near enough a crate to deposit the gear.
Spawning Zombies:
Zombie spawning requires debug mode. Here's the process:
1. ENABLE DEBUG MODE: Press F1 to open the console. Type dm (stands for debug mode) and hit Enter. This activates the debug menu and gives you access to additional features.
2. OPEN THE ENTITY SPAWNER: Press F6 to open the Entity Spawner menu. This displays a list of all available entities including every type of zombie.
NOTE FROM THE CHALLENGE CREATOR: When I followed these steps, I had to press Escape a couple of times before the spawner menu would actually come up. If F6 doesn't seem to work right away, try hitting Escape once or twice and then press F6 again. That did the trick for me.
3. SELECT AND SPAWN: Browse the list of zombies in the Entity Spawner menu. Click on the type you want to spawn. The zombie will appear at the location your crosshairs are pointing at. If you want to spawn multiple, click the zombie type multiple times or adjust the spawn amount in the menu.
4. POSITIONING: Be mindful of where you're looking when you spawn — they appear right in front of you. There is a "Look At You" option in the spawn menu if you want the zombie facing you when it appears.
TIP: If you're in creative mode, you can spawn zombies without enabling debug mode, but the steps may vary depending on your game settings.
PHASE 1: ARRIVAL AND SETUP
Dropping In
You've arrived in the disaster zone. Your first priority is establishing a base of operations and getting equipped for crisis response work. This is your chaotic opening — supply drops are unreliable and every crate you call in has consequences later.
Step 1: Choose Your Main Base
Scout the area and pick one building that will become your permanent home and fortress. Choose carefully — this is where you'll live, work, store supplies, and defend during blood moons for the entire challenge. Consider defensibility, central location for rebuilding, and structural potential.
Step 2: Call In Air Drops
Use the debug menu spawnsupplycrate command to drop supply crates at your base location. For each air drop event, ALSO spawn the regular air drop — your supply coordinator drops one at base while the air ship drops one wherever it lands. Don't chase the remote drop across the map; grab it when convenient as you are in that area. That flight is just your cue that when at basecamp you also have one. The spare one is for other folks like traders but if you happen on it you claim it as of course you don't leave behind stuff when you discover a 'lost' shipping crate.
For each air drop discovered, spawn ONE zombie using the enemy spawner. Preferably pick a zombie type you haven't fought before — this is your crisis response training. Businessmen zombies are there for days when you just don't feel like a hard fight. Keep a tally of every air drop and every zombie spawned.
Step 3: Gear Up
Keep calling in air drops until you have all three of the following:
* At least one firearm (your "tranquilizer gun")
* At least one armor set (your crisis response protection)
* One wood crate completely filled with trade goods
CRITICAL RULE — EQUIPMENT STANDARD: Whatever quality of gun and armor you choose for yourself becomes the MINIMUM standard you must provide for every bedroom in every house you rebuild. Choose a top-tier weapon? Every household gets top-tier. Grab the first basic pistol? That's your town's standard. This is your greed check — better personal gear means exponentially more work later.
Sort and store everything from every air drop in wood crates at your base. Nothing is disposable in this challenge. Items you aren't trading will eventually stock houses, equip bedrooms, or furnish buildings.
Step 4: First Advice
INVEST FIRST IN LEARNING HOW TO HUNT. Hunting provides sustainable food for kitchens, leather for Phase 3 clothing, fat and bones for crafting and paint supplies, and trade goods for the economy. A hunter can sustain a civilization. Someone who can't hunt will starve trying to rebuild one.
Give a man a fish? One day of life. Teach... now that is feeding as long as they are biting.
AIR DROP RULES AND ZOMBIE COSTS
Air drops are your lifeline but every one comes at a cost. Track every drop carefully — your zombie count is part of your final score.
Opening Phase Drops — 1 zombie per drop: Keep dropping until you have gun, armor, and a full trade crate. Everything stored at base.
Standard Rebuild Drops — 1 zombie per drop: One crate spawned at base + one air drop wherever it lands. Spawn one zombie per event.
Emergency Material Drops — 2 zombies per drop: When you need specific materials for building the FIRST workstation that was newly discovered. Must SCRAP contents to get materials — no direct handouts unless the item is not craftable. Supply chests have a rather set item list it appears to me. It might not have required items you can also do trade good replacement from SOLD scrap. Items unscrappable are able to be traded provided it is an item that can be sold.
Emergency Ammo Drops — 2 zombies per drop: For original tranq gun ammo when you've run out. EXPIRES permanently the moment you can craft that ammo type.
Emergency Medicine Drops — 1 zombie per drop: For antibiotics and critical medicine when legitimately out AND in need. Nearest trader doesn't have a supply you can trade for. Note if you have rebuilt a forest, your infected trees have honey. As soon as you have exactly enough meds you're not allowed to drop more.
Trade Goods Drop — 1 zombie per drop: When you unlock the dew collection ability and a trader has one. Drop as many as required to get the first water filter had they not given you ever an option as a completed request free filters. Filters are one of the most difficult things. A reliable water supply is worth it. The trader got your shipment and is charging out the crazy for it. The government states you'll be rebuilding for years potentially so only your personal needs are worth it to them to give you trade goods.
TRADE ECONOMY RULES
The trader is a businessman running a supply chain. He doesn't want your scavenged goods — he already sells that stuff. He wants what YOU produce.
What You CAN Sell:
* Books and schematics you have ALREADY read and learned from
* Items you've crafted or scrapped from air drops
* Food you've personally grown on your farms
* Food you've personally cooked
* Small early-game trades before your base is complete (limited)
What You CANNOT Sell:
* Any book or schematic you have not personally read first — knowledge before profit, always
* Food you found or looted — the trader still has to know when it expires and those found cans of food have the label torn so those are no good. He might buy it for himself but you're a government employee do you sell goods of questionable origin?
* Medicine — not until your base has a full stack of each type. Community health comes before profit.
Remember that traders have limited buying capacity for various item types that cycles as he 'trades' with other people. You cannot flood the market. Plan your sales carefully.
PHASE 2: THE GREAT REBUILD
With your base selected and gear secured, the real work begins. You are methodically rebuilding every structure in the area into a functioning piece of civilization. Every building must make structural sense, be fully furnished, and be contextually appropriate for what it is.
Your Main Base — Build This First
Your main base must be the first building fully completed. This is your home, your workshop, and your blood moon fortress. It must meet ALL building requirements below plus proper blood moon defenses. Your defenses must make structural and architectural sense — reinforced walls, barricades, shuttered windows, fencing. It must be functional as a fortress. A real building. I build moats around mine and fill them with traps and get functioning draw bridges.
MILESTONE: Once your main base is fully complete with all requirements, you unlock blood moon defense. Until then, you are just a builder in a quiet world with the occasional zombies brought out by the sounds of airplanes and the opening of food. Every supply crate I have opened had something to eat in it. This is 'questionable' food as who knows how long it was in flight and stuff but its good for me as chopping down complete forests and replanting them and deep mining is a hungry type of day.
Building Requirements — Every Structure
Every building you restore must meet these requirements. The building is not complete until all applicable items are checked off.
STRUCTURAL AND AESTHETIC:
* All structural damage repaired — walls, floors, ceilings, roofs
* All holes in bridges and roads patched — there are flat plates available that are solid
* Entire building painted inside and out using crafted paint
* Building must make structural sense — no floating blocks or impossible architecture unless you 'created' a treehouse for a kid. It can be fun and challenging.
WORKSTATIONS:
* All workstations built in every house: forge, workbench, cement mixer, cooking station etc.
* Workstations should be placed where they make sense for the building layout. In your defensive fort its best to have them two blocks up from the floor. If it is a designated fort that is an exception.
ROOM FURNISHING BY TYPE:
Bedrooms: Bed, dresser, and appropriate furniture. Each bedroom must also contain one tranquilizer gun (firearm matching your personal equipment standard or better) and one armor set matching your chosen tier. It also requires 100 of the best bullets for the gun you can craft at the time of stockpiling.
Bathrooms: Bathroom fixtures and appropriate items.
Kitchens: Cooking station, cabinets, refrigerator/storage stocked with cooked meals and food items. Fill until full or until you've exhausted your recipe list.
Living Areas: Appropriate furniture, lighting, and decorative items. You need electrical power sources unlocked. Lights require generators.
Contextual Stocking — Everything Must Make Sense
Items placed in buildings must be appropriate to what the building IS:
* Bars: Soda jerk stocked with every craftable drink. Beer fridges filled with beer. Liquor shelves stocked. Snack food on counters.
* Coffee shops: Coffee maker with coffee beans and coffee.
* Restaurants/Diners: Kitchen stocked with restaurant-appropriate food.
* Stores/Shops: Cash registers at counters. Shelving stocked with goods appropriate to the store type.
* Hardware stores: Tools and building supplies on shelves.
* Clothing stores: Clothing and armor items displayed.
* Bookstores/Libraries: Books on shelves.
* Gas stations: Snacks and drinks, not gourmet meals.
* Hospitals/Clinics: Medical supplies, not food or beer.
* Mechanic shops: Workstations and tool storage.
* Home kitchens: Family meals, canned goods, water, practical everyday food.
General rule: If it wouldn't make sense on the shelf of that real-world business, don't put it there.
MEDICAL SUPPLY CABINET ("MEDKIT")
When this challenge refers to a "medkit" for each building, it means the full collection of individual medical supplies listed below — not a single item. Every building in town needs a properly stocked medical cabinet. In a world with blood moon crisis events, medical supplies must be accessible everywhere.
Required Per Building:
First Aid Kits: 10
Ace Bandages: 10
Plain Bandages: 10
Sewing Kits (for stitches): 10
Headache Pills: 10
Antibiotics: 10
Each Antivirus Type: 10 of each (Honey, Herbal, and standard)
Vitamins: 10
Steroids: 10 ONLY if you personally used them during the challenge. If never used, skip.
Medicine sales rule: Do not sell any medicine until your main base has a full stack of each type. Community health always comes before profit. After your base is stocked, surplus can be sold. Buy from the trader if you cannot find or craft enough.
VEHICLES AND TRANSPORTATION
A rebuilt civilization has cars. Houses have driveways. Businesses have parking lots. A shopping center without cars in the lot still looks abandoned.
Vehicle Rules:
* Every vehicle placed must have a minimum of 100 gallons of gas in the tank — these are working vehicles, not display pieces
* Vehicles should be placed contextually: one or two in a house driveway, several in a business parking lot, inventory at a dealership, vehicles at a mechanic shop
* Cars are BONUS POINTS — with no loot respawn, engines and batteries are extremely rare. Every completed vehicle is a genuine achievement
* Trader vehicle parts are your lifeline when scavenging runs dry
Car count is a key scoring metric. With finite engines, batteries, and parts across the entire map, with the exception of the trader selling occasional pieces this has a ceiling on how many vehicles you can complete. Finding that ceiling IS part of the challenge as engines are NOT CRAFTABLE. You get an engine DO NOT SCRAP or sell even if you have tons of crates as achieving a car for every home PLUS bonus ones on roads and in parking lots you park them HUGE so huge.
CLEAN WATER INFRASTRUCTURE
* Dew collectors require finding the filter and books with the dew collector schematic AND the trader having filters available — this milestone may take significant time
* Every dew collector placed anywhere in town is bonus points
* Achieving a dew collector at every home is among the ultimate infrastructure achievements
* Dew collectors represent clean water independence for the community when... you upgrade them all. All dew collectors created must be upgraded to make pure water to count. Murky Water Stations are still good points but providing homes with clean water is essential.
RESOURCE MANAGEMENT
With no loot respawn, you will eventually strip the existing world bare. Sustainability is not optional — it's survival.
Renewable Resources:
* Plant forests for sustainable timber. You're not just a builder, you're a land manager. Replant what you harvest.
* Farm crops for food to stock kitchens, restaurants, and bars. This is your primary food supply chain.
* Hunt for meat, leather, fat, and bones. Leather is essential for Phase 3 clothing. Bones and flowers are needed for paint.
* Craft paint from gathered materials — every building must be painted, so dye resources are always in demand.
Non-Renewable Resources:
* Mined resources (iron, lead, etc.) are finite. Budget carefully.
* Trader resource purchases become critical as mines deplete.
* Vehicle parts are among the most scarce resources in the challenge.
WARNING: You can die from cave-ins while mining, fall through the earth's crust if you dig too deep, and fall from the sky due to lag when flying. These are real threats in a permadeath challenge. Be careful with yourself.
BLOOD MOON PROTOCOL
With a 30-day frequency and 20-day variable range, blood moons can hit anywhere between 10 and 50 days apart. You never know exactly when the next one is coming, so you must always be ready. Rare blood moons means longer, harder blood moons when they do arrive. That's the trade-off for realistic frequency.
Procedure:
1. When you receive blood moon warning, log out, in the load screen, turn zombie spawning ON.
2. Defend your main base through the blood moon night using your tranquilizer gun and crisis response gear.
3. After blood moon ends, save your game, and logout.
4. Turn zombie spawning back OFF.
5. Return to rebuilding as honestly to rebuild the world in mostly peace.
Defense Philosophy:
You are a crisis responder, not a soldier. Your blood moon defenses must make architectural sense — reinforced walls, proper barricades, shuttered windows, fencing. These are real fortifications a real person would build.
During blood moon episodes, residents are in crisis. You are subduing them with non-lethal force (tranquilizer guns). Crossbow bolts are tranq darts. Shotgun rounds are beanbag rounds. Melee weapons are restraint tools. They go down, they sleep it off, and they'll be fine once the episode passes.
Remember: Not all zombies are bad. They're people with a condition. But during a bad episode, there's little reasoning with them. You do what you have to do to protect the community, and you treat them with as much dignity as possible.
UNLOCK REQUIREMENT: Blood moon defense is only available after your main base is FULLY complete with all requirements. Your claim block timeframe when you declare it is ready is your deadline to be certain — once the base is done, you're ready for regular blood moon visits but get that means during your peace time you must build defenses again as it will come around again.
NO BULLETS FOUND after the first blood moon and you get a warning of one you can do an emergency call for bullets or bullet components. You should have at least 1000 bullets before declaring you are ready for the first round from regular training and regular drops.
If this was not sufficient for you when you did the first blood moon in a prior game with said 'weapon' next time set the level of 1000 higher. This number can be insufficient depending on a number of factors. But get you should build to a minimum of 1000 bullets for guns. I have gone through somewhere over 3000 bullets once when my zombies got harder. 1000 did me for early rounds with lower zombie counts.
Zombie count for the blood moon was not set as a requirement but I also play with the highest zombie count allowed for that night. Get the zombie count does not mean the total number in that night but the minimum that will hit you over the tick. The zombies do not stop until the blood moon event is over. With longer day hours, the blood moon length lengthens as well. You get waves of them with little lull. But get you're not hiding in a bunker nope you're to be out on the ledge of the fort subduing them. Get I understand early panic rooms :D but we are not starting zombie crazy until we say. Yep bring it.
WEAPONS AND COMBAT RULES
Firearms (Tranquilizer Guns):
* Firearms/crossbows are ONLY for use on zombies — these are specialized crisis response tools
* For animals and other threats, use arrows, melee, and traps — primitive tools for non-crisis situations OR if using firearms must make a 'second' weapon. As a tranquilizer gun is not what you hunt with.
* Your chosen firearm quality sets the minimum standard for every bedroom in every house
* Once you can craft your ammo type, emergency ammo air drops are permanently cut off — you're self-sufficient now
Armor (Crisis Response Gear):
* Your chosen armor tier sets the minimum standard for every bedroom in every house
* Armor is required alongside the firearm in each bedroom so housemates can protect themselves during blood moon episodes
* The resident having the episode forgets how to use their gear, but their housemates don't
PHASE 3: THE COEXISTENCE
Every building is rebuilt. Every kitchen is stocked. Every bedroom has its safety equipment. Every car is fueled. Every wall is painted. The town is ready for its residents.
Procedure:
1. Turn zombie spawning ON permanently.
2. Survive as many in-game days as it took you to complete Phase 2 (the rebuild).
3. Blood moons are now active with full zombie spawning — no turning them off after.
4. Feel free to let zombies destroy a few places during this phase. They're residents now — sometimes there's property damage.
This is the stress test. Did you build well enough? Are your defenses sound? Can your community infrastructure withstand its new population? The town you lovingly rebuilt is now being lived in — and living is messy.
The survival timer is self-balancing: slow rebuilders face a longer survival gauntlet. Efficiency in Phase 2 is rewarded with a shorter (but still challenging) Phase 3.
PHASE 4: THE CURE
You survived. The community held together. And now — the cure works. The residents are people again. They wake up confused, grateful, and wearing shredded clothes.
Procedure:
1. Turn zombie spawning OFF. The residents are cured.
2. Survey the damage from Phase 3 and rebuild everything the zombies destroyed.
3. Every building must return to full completion standards.
New Requirement — Clothing:
The residents just woke up from being zombies. Their clothes are destroyed. These are PEOPLE again and they deserve proper wardrobes.
* Every dresser in every bedroom must be stocked with clothing
* Clothing must be contextually appropriate to the environment and building type
* Cold biome homes need warm coats and sturdy boots
* Desert homes get lighter clothing
* Business workers need business-appropriate attire
* Mechanics need work clothes
* Medical staff need medical wear
* Farmers need practical outdoor gear
This requires unlocking clothing recipes, gathering leather and cloth and fiber, and tailoring outfits for an entire town's worth of newly cured citizens. On top of all the repair materials you need. With a world you've already stripped twice.
These people woke up human. You're making sure they feel human again.
SCORING AND BRAGGING RIGHTS
When you post your completed challenge, these are the numbers that tell your story. Every metric reveals a chapter of your experience.
Zombies Subdued: Your career crisis response record. High count = lots of air drops = either bad luck or ambitious gearing. Remember — you are subduing them. You are ending their aggression phase, not ending them.
Buildings Fully Restored: The scope of your rebuild. Every building is a massive undertaking.
Equipment Tier: Your personal gear level which determined the standard for the entire town. Higher = harder.
Cars Completed (+ Gas): The ultimate resource challenge. Every fueled car is a flex. Total possible is limited by the map.
Dew Collectors Placed: Clean water infrastructure. Every home having one = elite achievement.
Days to Rebuild: Efficiency metric. Also determines your Phase 3 survival length.
Days Survived (Phase 3): Proof your civilization can endure. Equal to your rebuild time.
Emergency Drops Used: Shows where you struggled. Higher = rougher road.
A perfect run: Every building restored, painted, and contextually furnished. Every kitchen stocked. Every bedroom armed and armored. Medical cabinets everywhere. Cars in every driveway and lot with 100 gallons each. Dew collector at every home fixed to make pure water. Survived the full zombie phase. Clothing in every dresser. That's nearly impossible — but that's the ceiling you're chasing.
QUICK REFERENCE: PER-BUILDING CHECKLIST
Every Building Must Have:
* All structural damage repaired or demolished and rebuilt
* Fully painted inside and out
* All workstations (forge, workbench, cement mixer, cooking station)
* Rooms furnished appropriately (beds, dressers, bathroom fixtures, kitchen items, living room furniture)
* Context-appropriate stocking (food in kitchens, drinks in bars, cash registers in stores, tools in hardware shops)
* Full medical supply cabinet (see Medical Supply Cabinet section)
* One firearm + one armor set per bedroom (matching your personal standard or better)
* Food storage filled with cooked/grown food until full or recipes exhausted
* Dew collector (bonus points)
* Appropriate vehicles in driveways/parking lots with 100 gallons gas each (bonus points)
Phase 4 Addition:
* All repair damage from Phase 3 fixed
* Clothing stocked in every dresser, contextually appropriate to building and biome
CHALLENGE VARIANTS
The Rebuilder has three ways to play. Each one is a permadeath challenge. You die for any reason and it's over — zombies or no zombies, cave-ins and lag don't care which variant you picked.
VARIANT 1: THE REBUILDER (FULL CHALLENGE)
This is the main challenge as described above. Full zombie mechanics, crisis response narrative, all air drop types including emergency drops, blood moon defense, four phases from arrival through cure. The complete experience.
VARIANT 2: REBUILD FROM NOTHING
Same world. Same residents with the same condition. Same blood moons if you want them. But your government has other priorities and your supply line is a joke.
The Setup:
You were dropped into the zone and bandits robbed you on arrival. Took everything. One of the traders took pity on you and handed you next to nothing — just enough to not die in the first five minutes. That's your start. No military supply coordinator calling in crates full of gear. No emergency drops when things get tight. You earn everything.
What Changes:
* NO STARTER GEAR — you begin with whatever scraps the trader gave you and whatever you can scavenge from the ruins
* ONE AIR DROP PER DAY — spawned at your main base, that's it
* NO EMERGENCY DROPS — no emergency material drops, no emergency ammo drops, no emergency medicine drops. You have ZERO emergencies because you should have zero emergencies. Plan better.
* NO BONUS DROPS — the trade goods one-time window does not exist
* ZOMBIE SPAWNING STILL AVAILABLE — you still spawn one zombie per air drop using the standard rule. You can still defend on blood moons. The residents still have their condition. You just don't get a safety net while you deal with it.
What Stays the Same:
* All four phases (Arrival, Rebuild, Coexistence, Cure)
* All building requirements, stocking rules, and quality standards
* All medical supply cabinet requirements
* All vehicle, dew collector, and painting requirements
* Equipment standard rule still applies — your chosen gear sets the town standard
* Blood moon protocol and defense philosophy
* Permadeath
* Scoring metrics (your emergency drops score will be zero — that's the point)
This variant is SLOWER. With only one daily drop and no emergency supplies, you are scavenging harder, trading smarter, and building more carefully. Every resource matters more because there is no bailout coming.
VARIANT 3: THE WAR-TORN REBUILD
There are no zombies here. There never were. This area was destroyed by war and the residents fled. You've been sent in to rebuild it from the ground up so that citizens will want to come back and make it their home again. Right now your only points of contact are the traders, and they're a crude sort — but they're all you've got.
The Setup:
Your government dropped you into a war-torn zone with a mission: make this place worth living in again. On the way in, bandits robbed you of everything your government issued. One of the traders took pity and gave you next to nothing. The government has bigger problems than resupplying one rebuilder. You're on your own.
What Changes:
* NO ZOMBIES — zombie spawning is OFF for the entire challenge. No blood moons, no crisis response, no aggression phases. The residents are gone, not sick.
* NO STARTER GEAR — bandits took it. You scavenge and trade for everything.
* ONE AIR DROP PER DAY — spawned at your main base, no zombie cost since there are no zombies
* NO EMERGENCY DROPS — same as Rebuild From Nothing. Zero emergencies.
* NARRATIVE SHIFT — you are not healing residents. You are rebuilding a destroyed area to attract new citizens. The better you supply the town, the more citizens would be attracted to move in. Every stocked kitchen, every armed bedroom, every medical cabinet says "this town is ready for people who deserve safety and comfort."
Optional: The Infiltrator Phase
If you want the tension of watching your work get tested, you can add an optional destruction phase. Instead of zombies with a medical condition, these are infiltrators — people who came to tear down what you built rather than live in it. Turn zombie spawning on for a set period, survive it, then rebuild the damage. This is entirely optional. If you just want to build and never watch it get destroyed, skip it.
What Stays the Same:
* All building requirements, stocking rules, and quality standards
* All medical supply cabinet requirements — it's a post-war zone and accidents happen
* All vehicle, dew collector, and painting requirements
* Armor and firearms in every bedroom — citizens want home defense provisions. This was a war zone. They want to feel safe.
* Clothing in every dresser — you're building homes people want to live in
* Contextual stocking for every building type
* Permadeath — cave-ins, falls, starvation, and lag don't need zombies to kill you
A Word on Pacing:
Plan your sustainable resources well. With only one air drop per day and no emergency drops, what you have is not going to be around forever in this version. Farming, hunting, forestry, and careful trading are not optional — they are your entire supply chain.
Be prepared: it takes a LONG time to build one building from scratch when you are scavenging every nail, board, and pipe. This variant is a slow burn. Enjoy the process. That's the whole point.
And if you do decide to spawn a few zombies for those experience challenges — don't underestimate them. At Survivalist difficulty, even businessmen zombies are no kittens. With the scrapped-together gear you'll have in this variant, a businessman is doable but difficult. Respect the fight.
Important Note on Experience and Zombie Spawning:
With no zombies, the game challenges that require zombie encounters are simply not available to you. You cannot complete those without ever spawning any. That's the trade-off for a peaceful world. The very first zombie challenge only requires five — and even that isn't available if you never spawn a single one.
Friendly advice: even if you never plan to turn zombies on for the full challenge, spawning five is great experience and well worth doing. Businessmen zombies (non-feral) are among the easiest to deal with. Don't expect loot though — normal zombies have a 2% drop chance, ferals and radiated bump up to a whopping 3%. That's roughly one drop per twenty zombies on a good day. Players have reported subduing dozens without seeing a single item. So WHY? Just experience. But that experience adds up.
A note on the zombie spawning setting: the game warns that zombie events can still occur even with spawning turned off. In the challenge creator's personal experience, with zombie spawning off, there has never been a single zombie event that was not personally spawned using the entity spawner. Your experience may vary, but that has been the case every time.
A FINAL WORD
This challenge was born from a simple philosophy: I love big beautiful cities and I love healing folks. In a game built around survival and destruction, this is a challenge about creation and compassion. You're not surviving against the world. You're rebuilding it for the people who live in it.
Personally, I love the original Rebuilder best. I view it as healing people rather than being attacked by invaders, and that changes everything about how the challenge feels. The quicker start with proper gear means I can get to the real work faster — the rebuilding, the stocking, the making of something beautiful. I can do the grind and I have, but I'd rather have my tranquilizer gun and decent armor at the start for when the challenge really gets going.
Every painted wall, every stocked kitchen, every medical cabinet, every set of armor in a bedroom dresser — it all says the same thing: these residents matter, and they deserve better than ruins.
Whether you take on the full Rebuilder with all its chaos, strip away the safety net in Rebuild From Nothing, or build a peaceful new world in the War-Torn Rebuild — the heart of the challenge is the same. You are making something beautiful for people who need it.
Now go build something beautiful. And if the blood moon comes, protect it with everything you've got.
Good luck, Rebuilder. The community is counting on you.
FINAL ADVICE: INVEST FIRST IN LEARNING HOW TO HUNT. Anyway I have started it again myself and this time nothing is respawning for me. All goods are one time only. Doesn't matter if I have not been in that area before and I hope it doesn't apply to rocks and bird nests too. But hey eggs might be in real short supply eventually :D


Comments